Easter Eggs

Easter eggs can be customized in many different ways. Here are some creative ideas to give your Easter eggs some added creative flair. With some common craft items such as markers, glitter, googly eyes, crayons, pipe cleaners and acrylic paint, you can customize and can do the following:
Instructions
- Step 1
Sprinkle sparkles over a freshly-dyed egg for a glittery finish.

 Did You Know
Some of the most expensive and most famous Easter eggs were created in the 1800s by Peter Carl Fabergé, a Russian jeweler. These decorative eggs were adorned with jewels, gold and gems.
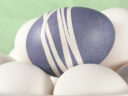
- Step 2
Before putting the egg in the dye, draw a pattern on the shell with a white crayon. The wax in the crayon will prevent the dye from sticking to the egg, leaving a white pattern.

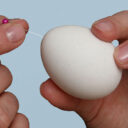
- Step 3
Apply small stickers to, or wrap rubber bands around the egg before dying; remove once the egg is dry, leaving an interesting pattern.
- Step 4
Mix 1 tablespoon of vegetable oil into the dye to create a marble effect on your Easter eggs.

- Step 5
Once dry, paint the egg using acrylic paints and small makeup or craft sponges. You can also sponge paint small designs on the eggs using a stencil.
- Step 6
Glue small beads, embroidery thread or lace onto the Easter egg for added effects. Apply googly eyes and other accessories to Easter eggs to create cute animals or faces.

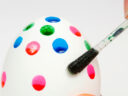
- Step 7
Apply acrylic paint to a small piece of bubble wrap; wrap around the outside of the egg, leaving a pattern of perfect circles.

- Step 8
Rub Easter eggs with a little vegetable oil for extra sheen.